|
Overview
I often get questions on how to use PhotoEngine with general purpose photography software. Here are the most common questions:
- Is it useful to use PhotoEngine in addition to my regular photo tool?
- Should I preprocess my photos before using PhotoEngine?
- What are the do's and don'ts of preprocessing?
The goal of this tutorial is to show how to use Adobe Lightroom and Oloneo PhotoEngine together to get the best possible results. You will discover that the right workflow and settings are not obvious. In fact, it is quite easy to get worse results by preprocessing your photos! You will learn how to avoid the common pitfalls.
I am using Lightroom 5.2 in this tutorial. The same rules apply to other products such as: Photoshop with Camera Raw, Capture One Pro and DxO Optics Pro.
This tutorial is the second in the Oloneo PhotoEngine Workflow series. In the first one, I covered panorama creation with Kolor Autopano and PhotoEngine.
I am assuming that you already have Lightroom or a simlar product and have some idea on how to use it. If you don't have PhotoEngine, now is the right time to download the free trial!

Part 1, is PhotoEngine actually useful?
When talking about workflow between PhotoEngine and Lightroom, it is perfectly legitimate to ask the question: is PhotoEngine actually useful? Can't we just use Lightroom?
If you are familiar with HDR, you already know the answer. A specialized HDR product like PhotoEngine is required when working with a scene with a large dynamic range. But is it also true with a medium dynamic scene such as the still life I am using in this tutorial?
Lightroom and other products have recently introduced features inspired from HDR software such as Highlight Recovery, Shadow Recovery, Clarity, etc. I was quite curious to see what could be done with these new features.
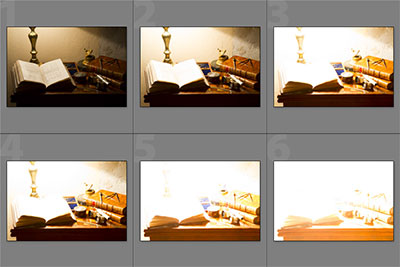
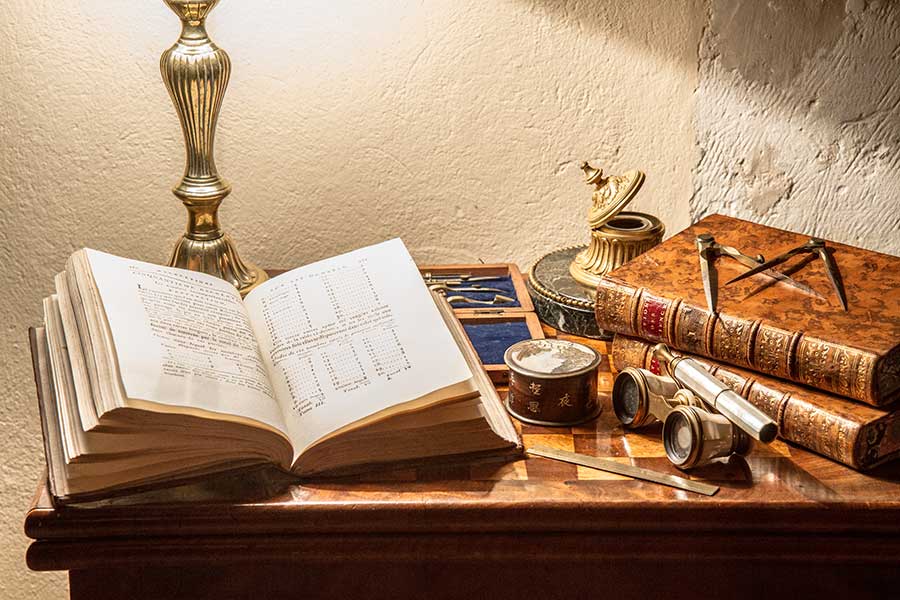
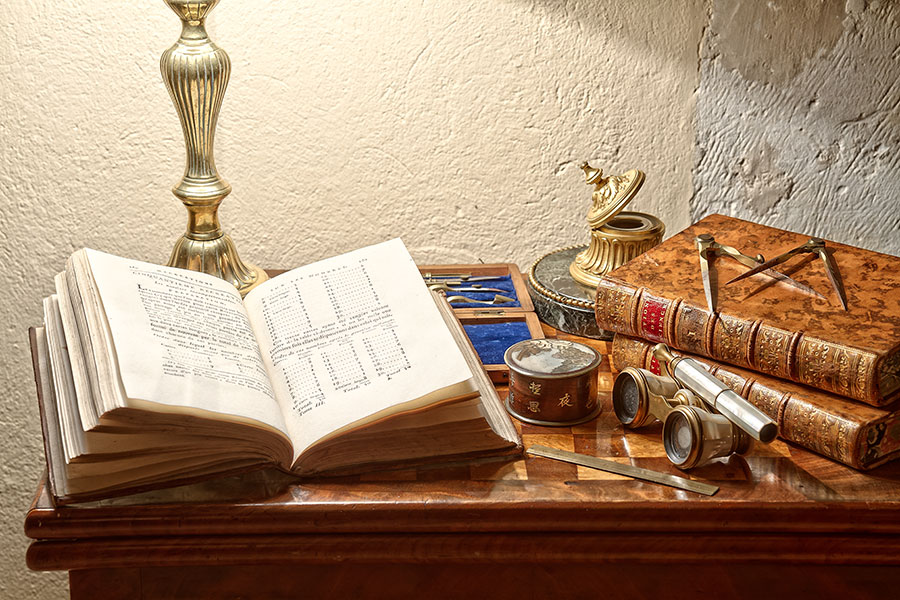
The photos used in this tutorial
One photo in the bracket set barely covers the whole dynamic range of the scene. Using this photo and Lightroom's Contrast, Highlight, Shadows, Clarity and Curve settings, I tried to create an image close to the one created with PhotoEngine.
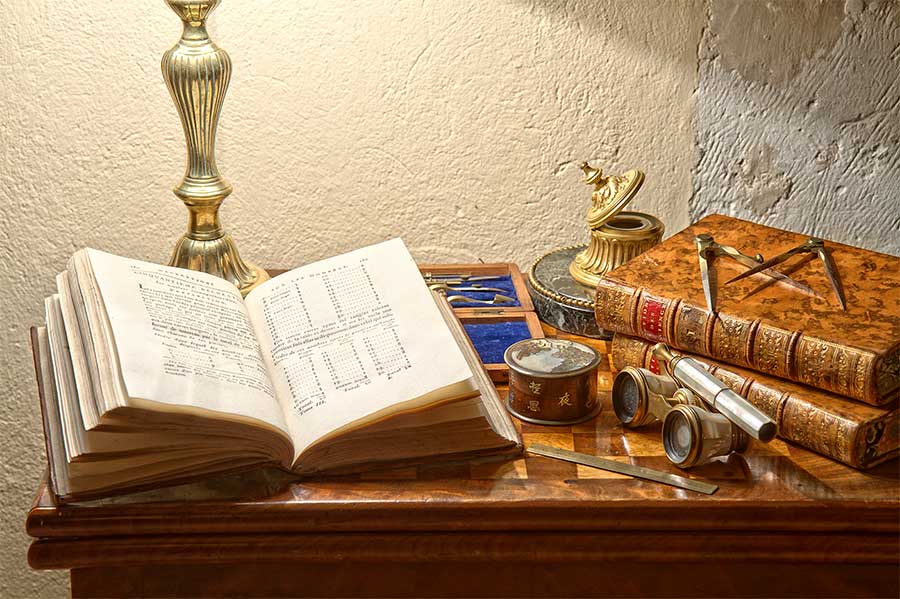
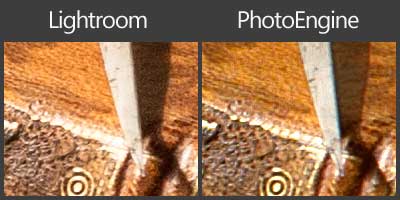
Photo edited in Lightroom only
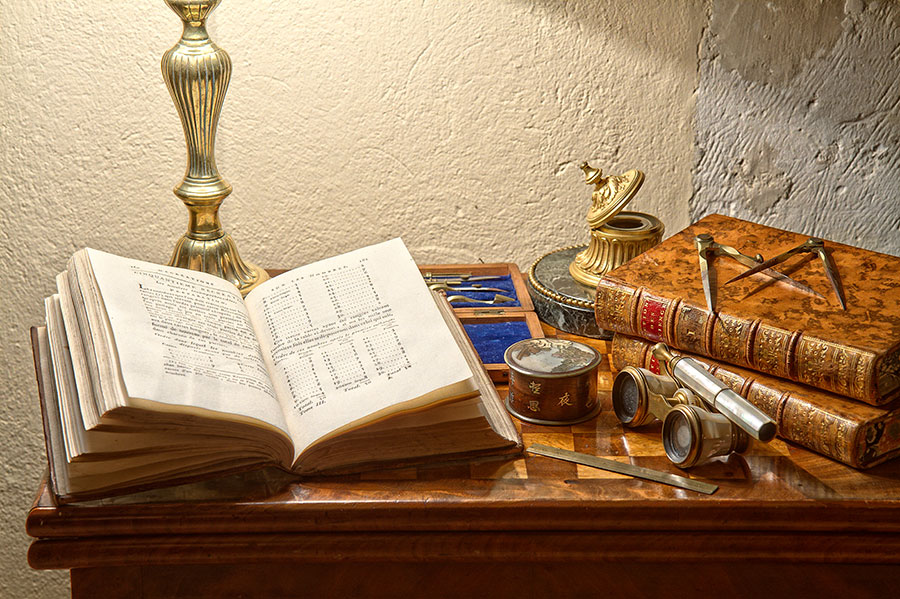
Photo edited in PhotoEngine only
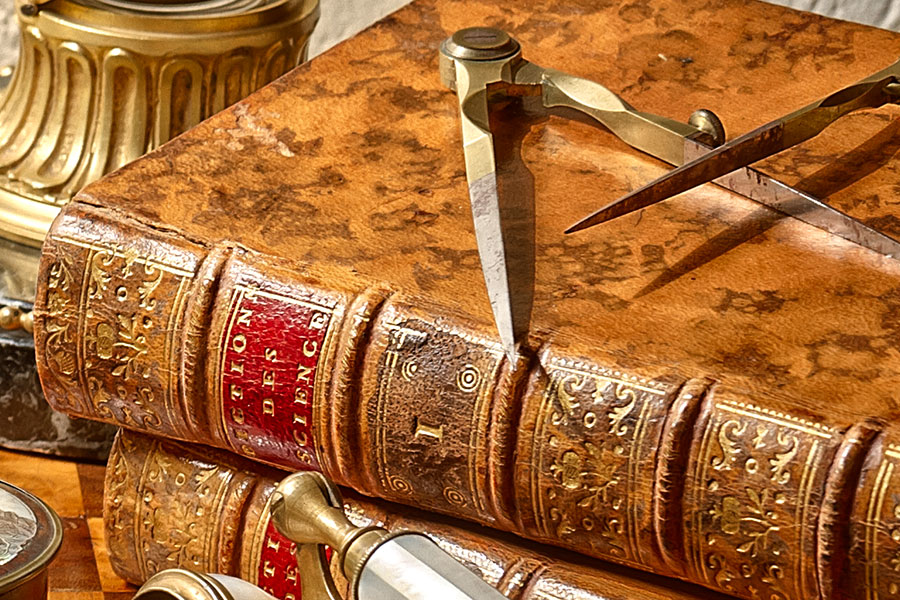
At first glance, the image is not that far from the PhotoEngine one! But looking at the details, we discover many issues.
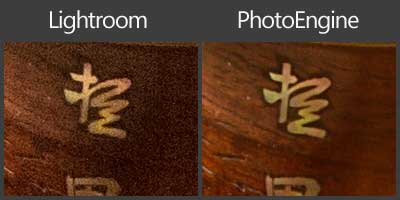
Unnaceptable noise in shadows
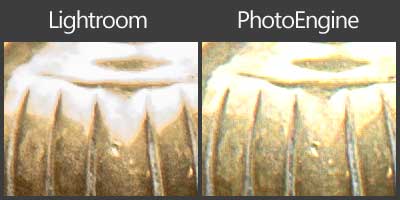
Burned highlights
PhotoEngine is clearly required even for medium dynamic range photos.
Part 2: is preprocessing useful?
In Part 1 we have seen that PhotoEngine was required. Then, can we simply just use PhotoEngine? Is preprocessing the photos with Lightroom useful?
If we look really closely at the previous images, we see that in some case Lightroom improves a bit the image.
Color noise and chromatic aberration
Lightroom has a sophisticated noise reduction feature. PhotoEngine also removes noise when combining the photos but you do not have a direct control. In addition to that, you can create custom lens profiles in Lightroom and correct various aberrations such as chromatic ones.
For the best image quality, it would be nice to combine the strengths of PhotoEngine and Lightroom. Can we simply preprocess the raw photos in Lightroom like regular photos and send the result to PhotoEngine? The answer is definitely NO! You will get a worse result than no preprocessing. Part 3 explains why and how to proceed to get the best out of Lightroom and PhotoEngine.
Part 3: how to get the most of Lightroom & PhotoEngine
We have seen that preprocessing with Lightroom can be useful. Let's just do that and see what we get.
Preprocessing without thinking!
Workflow:
- Use Lightroom to develop the raw photos, correct the noise, lens distortions, etc.
- Send the resulting images to PhotoEngine for HDR and Tone Mapping
This is the logical method. It is a simple workflow. Most of the users are using it. There is one small problem: this workflow is incorrect! Without even realizing it, you will get subpar images with this approach.
PhotoEngine project with three bracketed photos
The exact same project using photos preprocessed in Lightroom
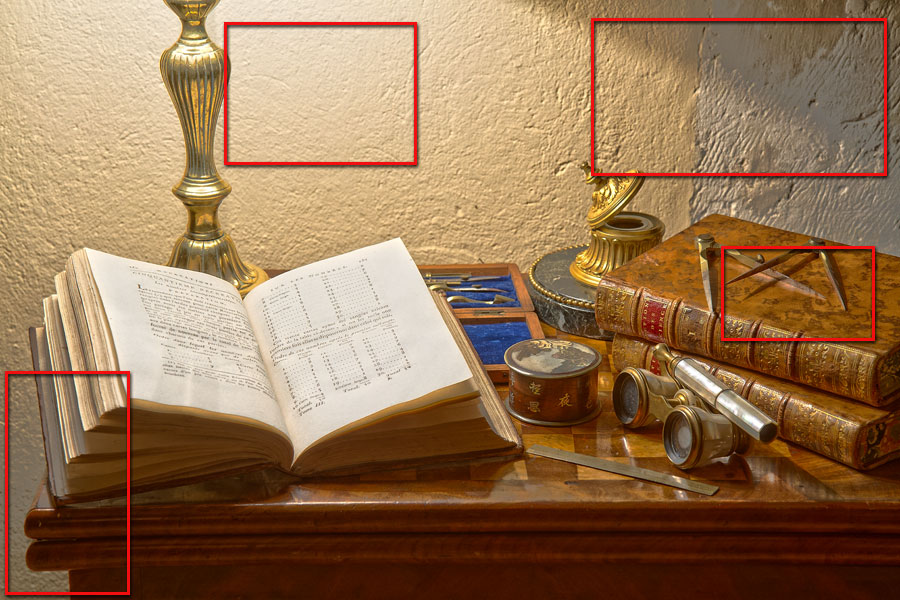
As can be seen, this workflow produces an awful result! It introduces many problems (loss of texture in the top/right and bottom/left corners, incorrect light gradient behind the lamp, book cover color has shifted, etc).
A bit of thinking and theory:
When creating an HDR image, the first step is to combine several bracketed photos. To do so, HDR tools combine each pixel of each exposure using a kind of weighted average. Pixels with a good exposure (not too overexposed and not too underexposed) have a higher weight; other pixels get a lower weight. Thanks to this process the resulting HDR image contains the best of each exposure and covers the whole dynamic range of the photographed scene.
Digital camera sensors are mostly linear: the recorded pixel values are proportional to the light intensity falling on the sensor. Because of that, combining pixels from raw photos with a weighted average works well and gives the wanted result (pixel values are recorded directly from the sensor without any processing in a raw file).
Linear photos are great for creating HDR images but look completely flat and uninteresting to the human eye. Because of that, all the cameras and photography tools always apply a fairly strong correction before displaying the photo. After this default treatment, the photos are not anymore linear and cannot be combined to create an HDR image.
Lightroom applies a default correction when developing a raw photo. Even worse, if you start editing the photo in Lightroom as usual you will increase the issue by applying additional nonlinear modifications. PhotoEngine will then combine non-linear photos and create an incorrect HDR image as demonstrated above.
The right workflow:
Knowing what the causes are, it is relatively easy to fix the issue. We need to find a way to turn off the default corrections applied by Lightroom. If you are using a different product, check the documentation to learn how to do that.
After that we can apply other corrections to the photos before sending them to PhotoEngine. We just need to be careful to avoid reintroducing non-linear changes.
Preprocessing don'ts:
- Exposure, contrast, brightness and anything related to curves
- White and black levels
- Clarity, highlights and shadows recovery
- Vibrance, saturation and anything related to color curves
- White balance (less of an issue but should be avoided)
Preprocessing dos:
- Lens geometry corrections
- Chromatic aberration
- Noise removal (without excess)
- Sharpening (without excess)
If you follow these rules, you will get the best of Lightroom and PhotoEngine
Observant readers are probably thinking that lens geometry corrections, noise removal and other accepted preprocessing are also non-linear ones! This is true but the corrections are “linear in respect of the HDR assembling”. For instance, lens geometry corrections are nonlinear deformations but all the exposures are corrected in the exact same way and then have no detrimental impact on the HDR creation.
Final PhotoEngine image with correct preprocessing in Lightroom
Final image (detail)
Part 4: Step by step tutorial
Step 1: opening a photo in Lightroom
- Start Lightroom
- Select one photo from your bracket set
- Click on Develop tab located at the top right
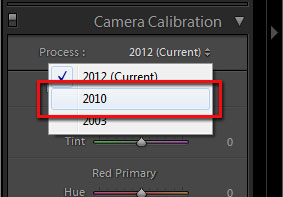
Step 2: switching to process 2010
Recent versions of Lightroom used the '2012 process'. This process hides the default correction applied to raw photos. We need to switch to the 2010 process first. If you have an older Lightroom you can skip this step and step 5.
- Scroll to Camera Calibration panel
- Set Process from 2012 to 2010
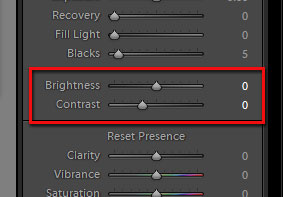
Step 3: reseting default brightness and contrast
As explained above, Lightroom always applies a correction to raw photos. We have to reset that.
- Scroll to Basic panel
- Set Brightness and Contrast to zero
- You can set Blacks to zero as well. This can generate highly saturated pixels in the deep shadows (especially with Nikon cameras). If unsure, leave Blacks to its default value.
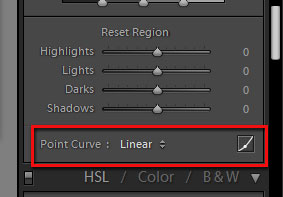
Step 4: reseting default curve
- Scroll to Tone Curve panel
- Set Point Curve to Linear
Step 5: switching back to 2012 process (optional)
If you have a recent version of Lightroom, you can switch back to the 2012 process. Lightroom will keep the changes you just made but will use current processing. This will change the color rendition and is the matter of taste. See if you prefer the 2010 or 2012 process.
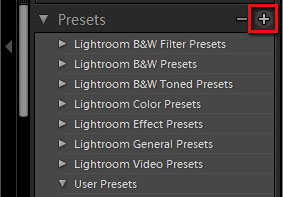
Step 6: creating a preset
Create a new preset with a meaningful name such as 'Linear Process 2012'. This preset will be your starting point when sending images to PhotoEngine.
Step 7: edit your settings
From there, you can create your own custom presets by editing the following settings (and nothing else):
- Lens geometry corrections
- Chromatic aberration
- Noise removal (without excess)
- Sharpening (without excess)
When done create a new preset with name such as 'PhotoEngine Preprocess'.
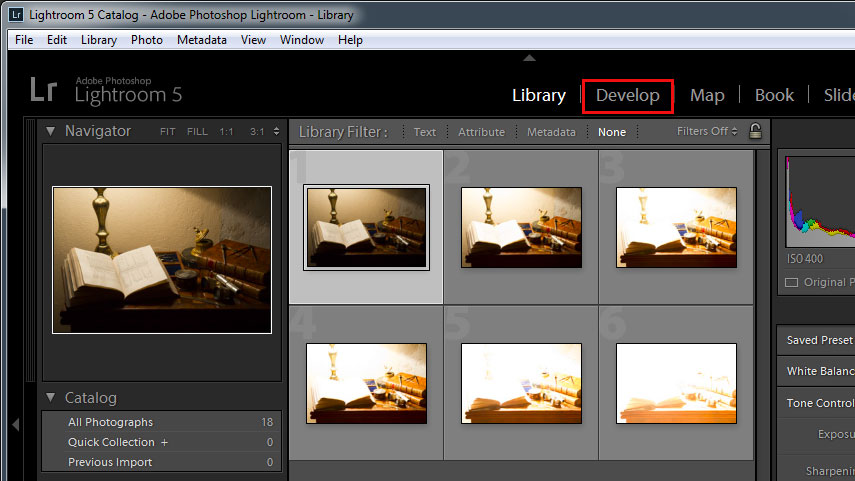
Step 8: preprocess photos and send to PhotoEngine
When ready to create an HDR image in PhotoEngine, apply the 'PhotoEngine Preprocess' preset to your bracketed photos.
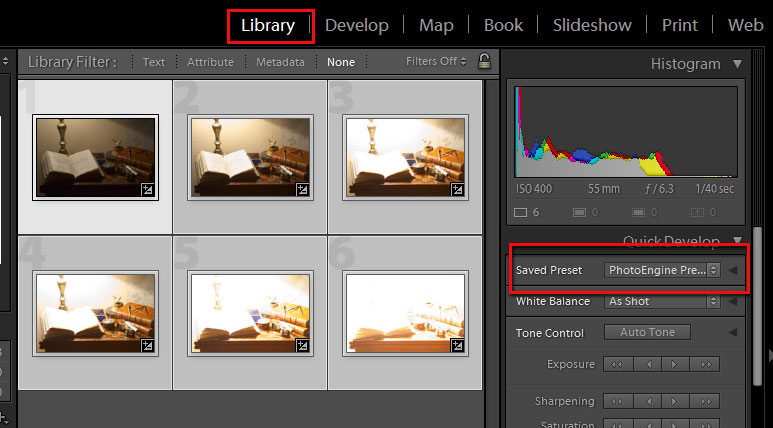
- In the Library room select the bracketed photos
- Click Saved Preset in the Quick Develop panel
- Select the 'PhotoEngine Preprocess' preset created at step 7
- The raw photos are now developed with linear settings and additional corrections such as lens distortions, noise removal, etc.
The photos are ready to be sent to PhotoEngine
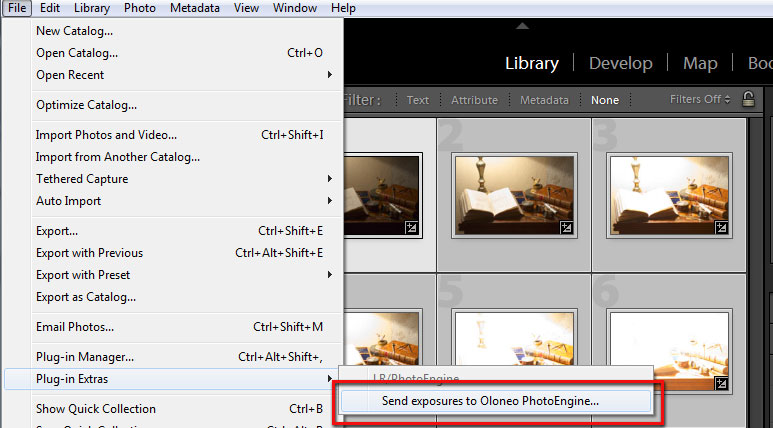
- Select the bracketed photos
- Select 'Send exposures to Oloneo PhotoEngine' locate in the 'File > Plug-In Extras' menu
- Click OK to send the exposure to PhotoEngine
Once your preset is created, you just have to repeat Step 8 to process other photos.
|